
Dear Beauty Editor,
Hi! I need an idiotproof self-tanner for my body. I’m currently the color of milk. I don’t want to look like an Oompa Loompa, and with summer coming, I don’t want to scare any children with my Casper-like legs. Thanks for any advice and recommendations. —Heather
Self-tanner is of those beauty products where results vary widely based on the self who does the tanning. But you, Heather, are not an idiot. So, let’s reframe: You need a self-tanner that works well for beginners — or those with beginner-level skills — and you need to improve your application technique. My advice is simple: Prep (exfoliate and moisturize) first, apply the product slowly, and use a gradual tanner (Vita Liberata, Jergens, or Tan Luxe) or a self-tanning mousse with a guide color (Isle of Paradise, St. Tropez, or Loving Tan). But I realize some context and details might be helpful — including how to remove self-tanner if you end up unhappy with your finished look. For that, read on.
Step 1: Choose your tanner wisely.
Most self-tanners contain dihydroxyacetone (DHA) and/or erythrulose. (DHA is a sugar that reacts with amino acids in your skin to develop a warm-brown color, and erythrulose works similarly, but more slowly, and creates a reddish brown color.) But the experts I spoke to said not to get too hung up on searching for specific ingredients. The language differs between companies, and many brands use proprietary technology that won’t appear on an ingredient list.
Instead, choose your product based on the format first and the brand name second. For beginners, Mel Valenzuela, owner of Best Miami Tan, likes the gradual lotions. Because they lack makeup-like colorants and have very low levels of self-tanners, “they go on like a regular body cream and develop gradually into a beautiful, subtle tan,” she says. If you apply the lotion once a day, you’ll probably develop a subtle tan by day two or three, depending on which brand and product you use. Here are all the best self-tanners.
Best Gradual Tanners
For something that works more quickly, aesthetician and self-tanning expert Nichola Joss suggests a self-tanning mousse with a guide color (Valenzuela and I like mousses, too). They’re proper self-tanners, so they have higher concentrations of self-tanning ingredients, and they contain a makeup-like colorant that gives you an immediate bronze effect and also shows you where you applied the product so you know where the fake tan will develop. And because they’re in a mousse format, they go on more precisely than sprays and more evenly than lotions.
Best Self-Tanning Mousses (With Guide Color)
Step 2: Exfoliate.
Start by exfoliating in the shower, using “a textured mitt to make sure you’re removing all dead skin cells and leaving a softer, more even canvas for your application of self-tanner,” says Joss. You can use an exfoliating scrub if you like, but I find nothing beats a non-oily liquid cleanser or bar (Dr. Bronner’s leaves zero residue to mess up your tan) and exfoliating gloves (I get mine at the dollar store, but Earth Therapeutics makes a nice pair, too).
Step 3: Moisturize.
Next, blot yourself dry and apply a non-active (no retinoids or acids), lightweight body lotion. Most of the self-tanning brands make prep lotions that are designed to work well with their products, so if you want to up your chances of success, use those. Or just choose something without rich oils, active ingredients (retinol, acids, etc.), or too much of that silicone-slip feeling.
Step 4: Apply the self-tanner.
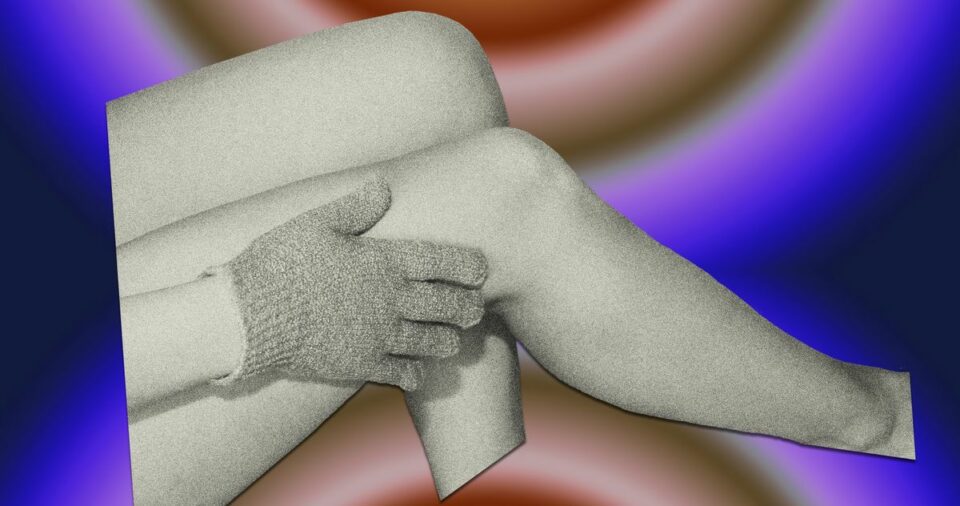
If you’re using a gradual tanner, apply it just like body lotion. “Don’t forget to wash your hands afterward,” says Valenzuela. If you go for the self-tanning mousse with guide color, use application mitts — yes, plural (Bondi Sands mitts are great and inexpensive). “If you use mitts on both hands, it’s easier to blend the product into the skin, and you can also reach trickier areas like the lower back, up the spine, and across the shoulders,” says Joss.
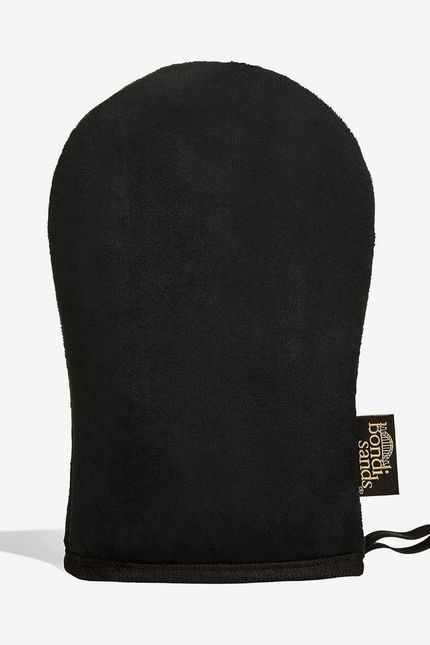
Bondi Sands Self-Tanning Mitt
$6 at Amazon
Start from the outer edges of your body and work toward the center: tops of feet and ankles; up the legs to the butt and middle; and then wrists, up the arms to shoulders and back. Start with the smallest amount of product you can use to cover yourself evenly, adding more as you go. If you can’t reach the center of your back, enlist a friend or family member, or “use a long-handled wooden spoon and secure the mitt on the end of it” (a hair tie should work). After your back, do your chest and neck, remove the mitts, do the back of your hands, then wash your palms. Since the mousse has a guide color, your skin should be pretty evenly bronzed. If you missed any spots or anything looks streaky, buff those areas using the remaining product left on the mitts. If the tan is too subtle for your liking, you can add more product later. “But wait two days for the product to develop fully before you reapply,” says Valenzuela. That’s it.
Step 5: How do I remove self-tanner?
If you get a rogue dollop of gradual tanner or self-tanner on your palms or somewhere else you want to remove it, immediately wash and exfoliate the area using your scrubby gloves. You’ll likely be able to prevent the pigment-developing reaction if you move quickly. If you don’t notice the issue until later, after the tan develops, that makes things a bit trickier. You can’t “erase” the pigment, but you can exfoliate away the layer of skin where the pigment has developed — returning your skin to its normal color.
To do that, rub the area with oil (baby oil, coconut oil, body oil, whatever you have on hand), then take a warm shower and use your exfoliating gloves to buff the skin gently. If that physical exfoliation doesn’t slough off enough of the color, a hair-removal cream like Nair Lotion will get the job done. The active ingredients in depilatory creams, which dissolve the protein bonds in hair, will also speed up your skin’s natural exfoliation process, removing the tanned layer of skin in the process. The longer you let the hair-removal cream sit, the more color will be removed. But follow the directions and don’t exceed the time indicated on the bottle or you’ll end up with very irritated skin.
Did I make the whole process sound easier than it is? Probably. Self-tanning takes practice. But as with other beauty rituals, like painting your nails, there’s a muscle-memory component, so the more you do it, the easier it gets. And remember, self-tanning is skin care, so there’s not going to be one, absolute best product that works perfectly for everybody.
Send your questions to [email protected]. (By emailing, you agree to the terms here.)
More Beauty Advice
- Do I Need Whole-Body Deodorant?
- What Beauty Products Should I Buy in Europe?
Jennifer G. Sullivan , 2024-05-15 20:38:10
Source link